How to Use the NCAA 14 DB Editor
NCAA Football 14 DB Editor and Bruteforce Instructions
ABOUT THE DB EDITOR
The DB Editor is a generic application utilized to edit rosters and other files from NCAA Football 14. It will be specifically used by league athletic directors, coaches, game planning assistants, and administrators. The purpose of these instructions are to outline the most effective and efficient manner in which to create / edit team rosters. As the league evolves, it is the responsibility of the coaching staffs to evolve with it.
WHAT YOU NEED TO KNOW
- These instructions are not the end all, be all. There are inevitably going to be issues as software, programs, applications update. If an issue is discovered that is consistently occurring, and being reported by others in the community, please let an administrator know.
- PS3 users have their own instructions separate from RPCS3 / PC users. See the appropriate headings below
- Most users in our league do not utilize Xbox 360 anymore therefore those instructions are not supplied at this time. Inquire if needed.
- RPCS3 files do NOT work with the PS3 without a significant rebuild process. It is suggested to start with a PS3 file. This file can be utilized by RPCS3 and then be shared amongst coaches or others as needed. See the instructions regarding cross platform.
IMPORTANT RESOURCES
- OKST56’s CSV File import / Export Video: https://youtu.be/raLPnbVk7BQ
- HornsNation’s DB Editor Instructions: https://drive.google.com/file/d/1AG9S30lvjzz-5Ft8n3ybltUnnJceDFWo/view
- Boss Hawg’s Roster editing 101 video: https://www.youtube.com/watch?v=WErIYpIxNhw&t=766s
NEEDED BEFORE BEGINNING
- PS3 Users
- WINRAR, 7ZIP, or another archiver extractor tool
- USB formatted FAT32 (should already have this if you have revamped)
- Brute force download link: https://mega.nz/#!FlUE0BwS!CVBtAi4QCCP8sUVzpu-m81V7u6xUlJLC2BPsN_wC_3s
- EA editor download link: EA DB Editor (mediafire.com)
- Microsoft Visual Redistributable Package https://www.microsoft.com/en-us/download/details.aspx?id=26999
- RPCS3 / PC Users
- WINRAR, 7ZIP, or another archiver extractor tool
- EA editor download link: EA DB Editor (mediafire.com)
- Microsoft Visual Redistributable Package https://www.microsoft.com/en-us/download/details.aspx?id=26999
TIPS BEFORE BEGINNING
- Please READ the directions more than once. You will be prompted to read the steps of regarding your issue before asking questions. Watch HornsNation’s, OKST56’s, and Boss Hawg’s videos to find easy tips. These are great resources to have.
- Please try Googling / researching to troubleshoot the issue prior to asking questions. Do your own research to understand what your specific issue is first, then ask questions. Knowing the issue before approaching administrators will save time and effort.
- Save roster files any time any edits are made, do not rely on the stability of any of these programs at any time, SAVE, SAVE, SAVE again.
- ALWAYS keep at minimum 2 versions of the same roster file. There will be accidents, make sure they are happy little accidents, and not sad, ugly accidents.
PS3 USER INSTRUCTIONS
Copy Roster File to USB from PS3
- Make sure USB is formatted FAT32, plug into USB port on PS3.
- With PS3 turned on and accessing the home screen, follow the ensuing file path: Games > Saved Data Utility (PS3) > scroll to the appropriate roster file.
- Press triangle on appropriate roster file, select copy, select your USB drive.
- When done copying, turn off PS3, and unplug USB to make sure no data loss occurs.
Microsoft Redistributable Installation
- Download and install the Microsoft Visual Redistributable package x86 version at the following link, Bruteforce and the DB Editor will not work without this installation. Go to this link right here Microsoft Visual C++ 2010 Service Pack 1 Redistributable Package. Follow the prompts as instructed.
Bruteforce Installation
1. Download Bruteforce from the link below, right click the file in windows file explorer and direct it to extract all to the desktop. Then, click the icon similar to the picture below to begin installation of the program. https://mega.nz/#!FlUE0BwS!CVBtAi4QCCP8sUVzpu-m81V7u6xUlJLC2BPsN_wC_3s
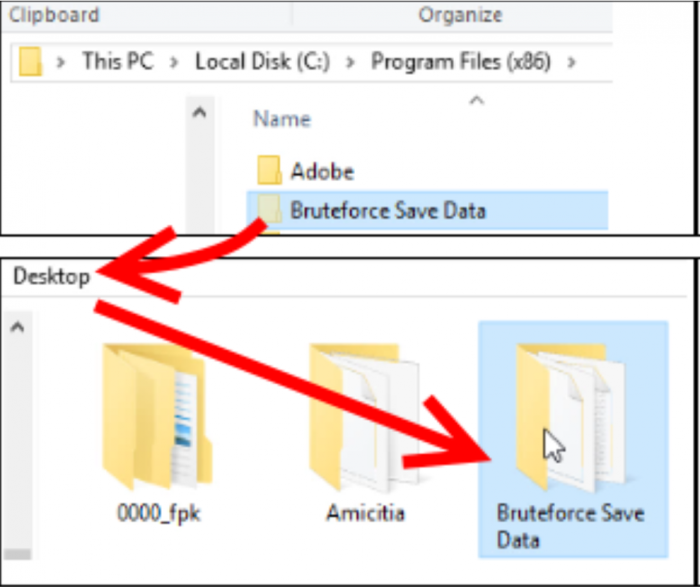
2. Once you are done following the prompts and Bruteforce is installed, move the folder called “Brute Force Save Data” from the installed directory on your PC (typically C:\Program Files (x86)\Bruteforce Save Data) to somewhere on your desktop. We must do this so that the program has the required read/write privileges to get the decryption key and dump the decrypted files. It is easy to complete by drag and drop. See the attached picture below on page 4.
3. If done correctly, there should be a file/icon labeled msvbvm50.dll on your desktop, drag and drop this into the Brute Force Save Data file on the desktop. Attached is a YouTube link that shows someone downloading the dll file, and dragging it into the Bruteforce save data file (Start watching this at 2 minute mark because you do not need to download the file from the internet, it already comes with your Bruteforce package that you downloaded). How To Fix BruteForce “msvbvm50.dll” Missing – YouTube
4. Plug in your USB into the PC from the PS3, and open Bruteforce. Exit the cheats pop up that first shows. The first time Bruteforce is opened, it will ask for a user profile (Enter your gamer tag). It may also At this point, move to EA DB EDITOR install
A. If an error pops up that says “The code execution cannot proceed because MSVBVM50.DLL was not found.” Either you did not properly install Microsoft Visual Redistributable package OR you need to install Runtime.
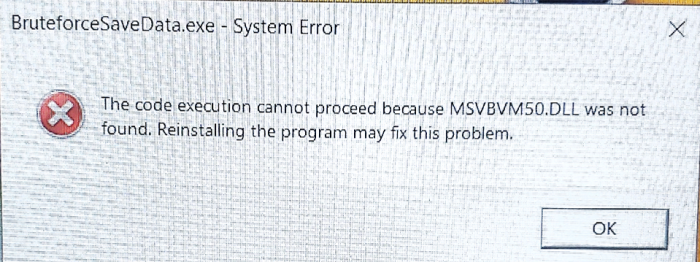
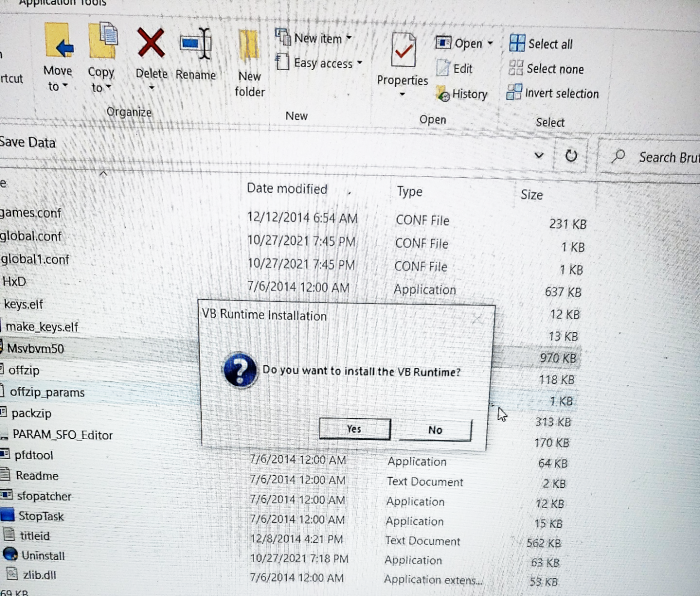
B. When receiving this error, try double clicking on the MSVBVM50.DLL application that is in the Bruteforce Save Data file, then tell it to install Runtime. See the images below for example of the error display, MSVBVM50.DLL application, and when Runtime is prompted to install.

DB EDITOR INSTALLATION
1. Download from this link and extract the EA editor file EA DB Editor (mediafire.com)
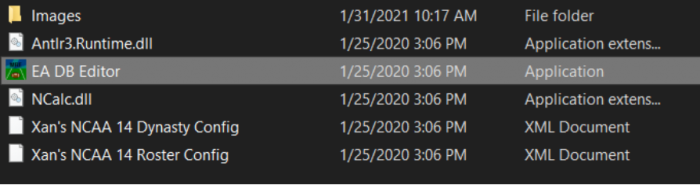
2. Select the EA DB editor in your proper file path (see image below

3. You now have access to the EA db editor
PS3 ROSTER EDITING 101
1. See HornsNation’s video for tips on this section. The USB with your roster file of choice should be plugged in already. Go to Bruteforce, and click on the “…” to choose your file path. Select the file path that clicks on your usb < PS3 < SAVEDDATA
2. Click on the file you want to edit in the middle of the application.
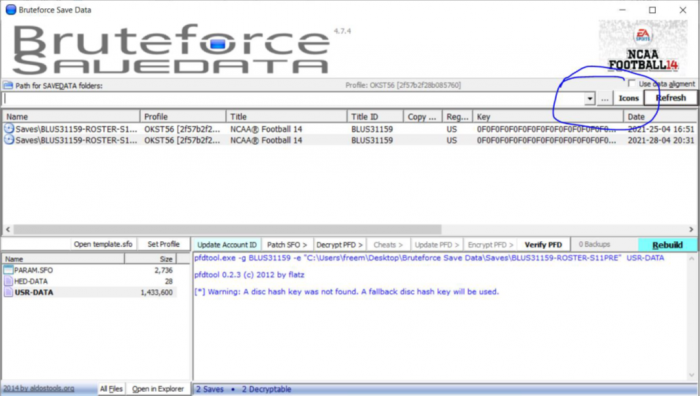
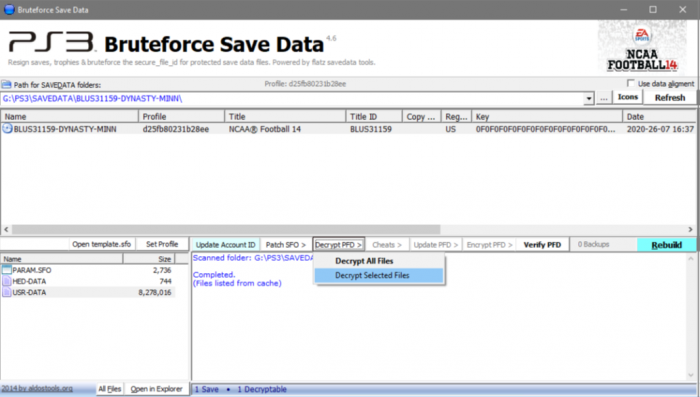
3. Then click on USR-DATA tab on the bottom left
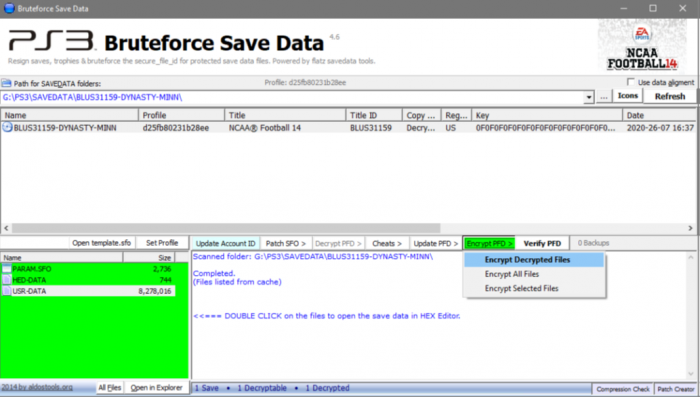
4. Click “Decrypt PFD”, select decrypt all files, and the application will turn GREEN. This is when you know that the files have been decrypted.
5. Now, leave Bruteforce OPEN. Do not do anything else there. Open your Windows File Explorer, and locate your usb drive < PS3 < Saved Data < Roster File < USR-DATA file. Right click on the file, select “rename” and just add .MC02 Final file name should say USR-DATA.MC02 (zero not the letter O) It will ask you if you’re for sure you want to rename, just click yes/okay.
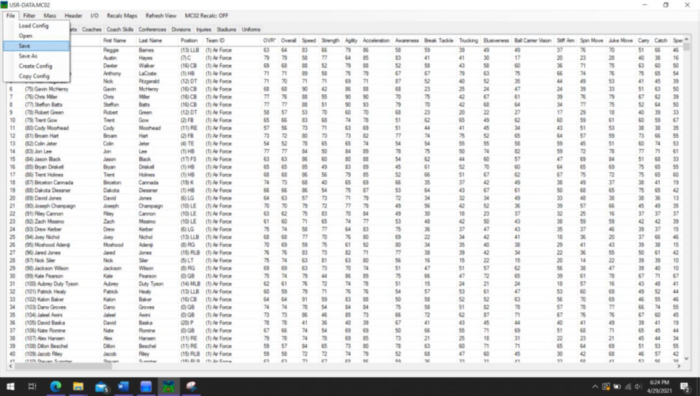
6. Now, go to your EA editor application and open it up. Once the editor is open it will be blank, select File > Load config.

7. Select Xan’s NCAA 14 ROSTER config (may have to find the proper file path)
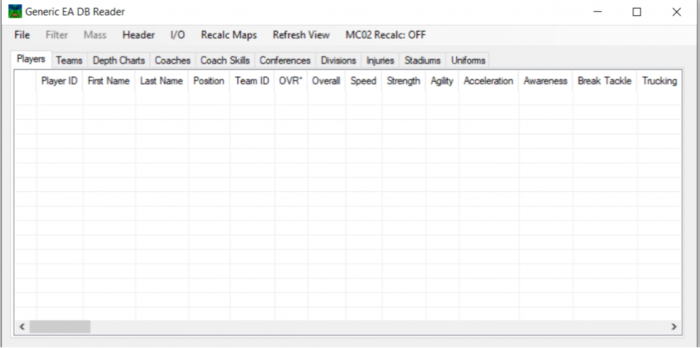
8. The Editor should now look like this
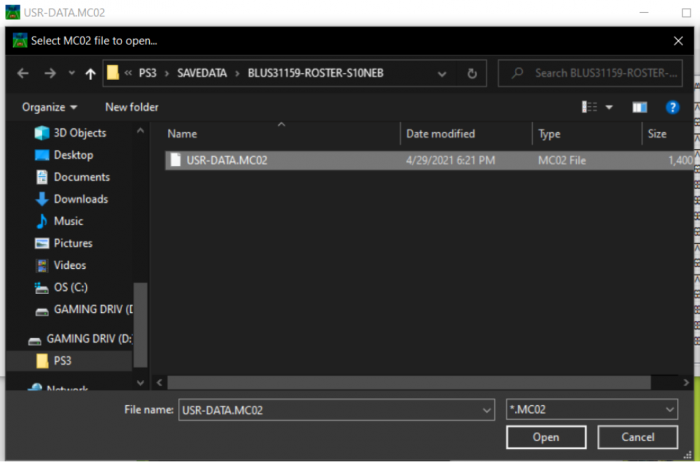
9. Select File and then Open, then locate your USR-DATA.MC02 file that your renamed from step 5 and load this file.
10. At this point, it will take several seconds to load but you should then have your roster available to make edits. During the time you are editing and especially when you are done, SAVE your roster in the EA editor application!! A good rule of thumb is to always have 2 files of the original roster file available because there is no undo button on this application. It is encouraged to save often after every small edit because then if you mess up, you can just close out of the application and reload the latest save of that roster edit without starting over (there is no undo button, please realize this). See the save roster function below.
11. When completely done editing, you have saved, and are ready to exit everything, first quintuple check that you SAVED. Exit the editor, go back to Windows file explorer to your USR-DATA.MC02 file that you renamed in step 5. You now need to rename it back to just USR-DATA just delete the .MC02 part that you added previously in step 5. It should now say USR-DATA only now.
12. Go back to Bruteforce now, and Select your USR-DATA file, Select “Encrypt PFD” and then “Encrypt Decrypted Files”.
13. At this point, you are done on the PC. Exit Bruteforce, eject your USB safely, plug into your PS3, turn PS3 on. On the home screen go to GAME < Saved data utility PS3 < USB device < roster file name. Click triangle, select copy to PS3. (If you have a copy of this roster already on the PS3, it will prompt you to copy your saved data of the same named file, select yes.)
14. Watch this guy’s video below to learn a little about how the application works to edit rosters. It’s kind of long but it will give you some things to just play around with and understand. NCAA Football 14: Roster Editing 101 – Youtube.
PS3 USER TROUBLESHOOTING
- PS3 says “Data Corrupted”: This is why you save your file a lot, and have multiple copies of the same roster named differently. However, usually the issue is that you forgot to rename your file before encrypting it. No worries, just shut the PS3 down, plug the USB back into the PC and run steps 1-5 again, except this time, don’t forget to remove .MC02 from the file name, complete Step 12 to encrypt your file again. Try the PS3 again.
- Bruteforce System Error “MSVBVM50.DLL was not found”: Any number of things could have happened, but likely you forgot to complete step 3 of Bruteforce installation regarding the .dll file. No worries, you have a few options.
- Option 1: locate the .dll file as instructed in step 3 of Bruteforce installation
- Option 2: If #1 doesn’t work, then locate the .dll application, double click it and tell it to install Runtime. It should install runtime and work after that.
- Option 3: Uninstall and delete all Bruteforce stuff, then just repeat the Bruteforce installation (Yes, this may take you a little more time, but sometimes doing this even though it is the same download link works.)
- Option 4: search endlessly on the internet on sketchy sites without confirmation of how safe the download is for the .dll file
- Bruteforce shows “Unreadable Key” and is not letting me decrypt my file: Sometimes this issue develops because the user did not download the Microsoft Visual C++ redistributable package make sure it is x86 version. Just follow the directions on that, and try again. If you are still having a problem, contact us.
RPCS3 / PC USER INSTRUCTIONS
DB EDITOR INSTALLATION
1. Download from this link and extract the EA editor file EA DB Editor (mediafire.com)
2. Select the EA DB editor in your proper file path (see image below)
3. You now have access to the EA db editor
RPCS3 / PC ROSTER EDITING 101
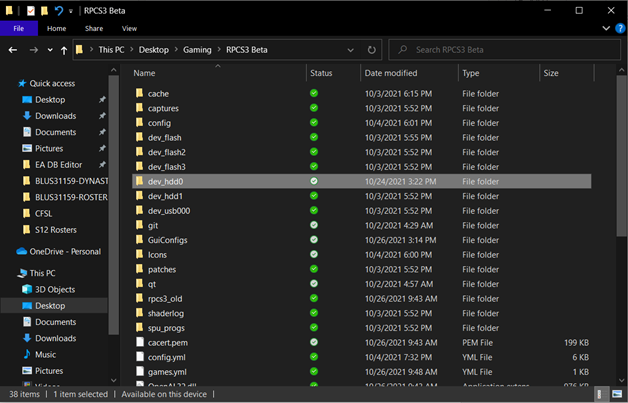
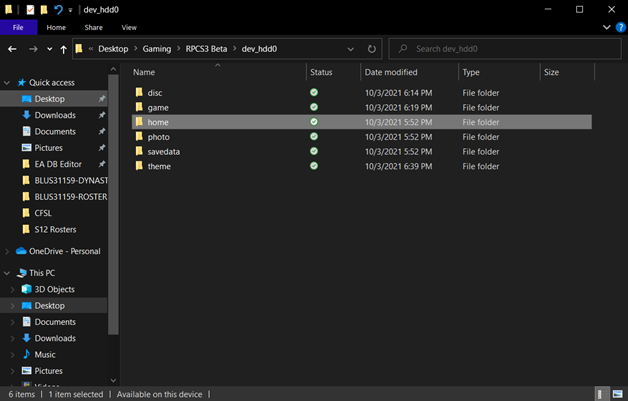
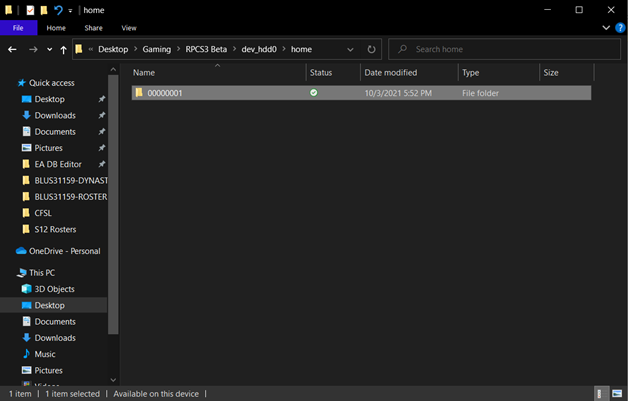
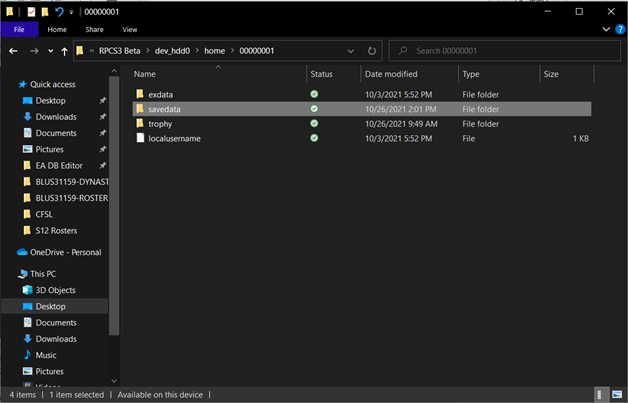
1. Locate the file path in which your roster on RPCS3 is located. RPCS3 < dev_hdd0 < Home < 00000001 < savedata < BLU#####-Roster-Nameofyourroster
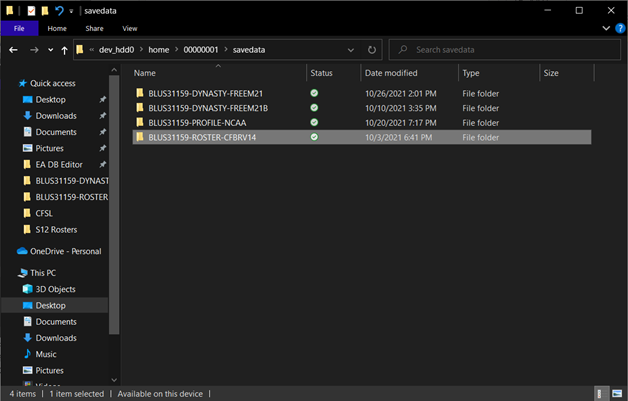
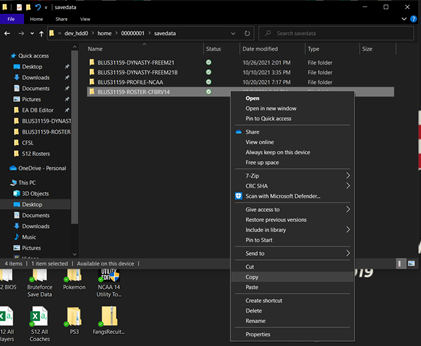
2. Right click the roster folder, copy, and paste to a spot on your desktop that is easy to find. The entire folder needs to be copied and pasted, do not just copy and paste the contents inside of the folder. Creating this copy of the roster file allows you to keep your roster file stored in RPCS3, so that if you make a mistake or if something corrupts, you have a second file that is still in RPCS3. Always save your roster multiple times under different names in case of a terrible accident.
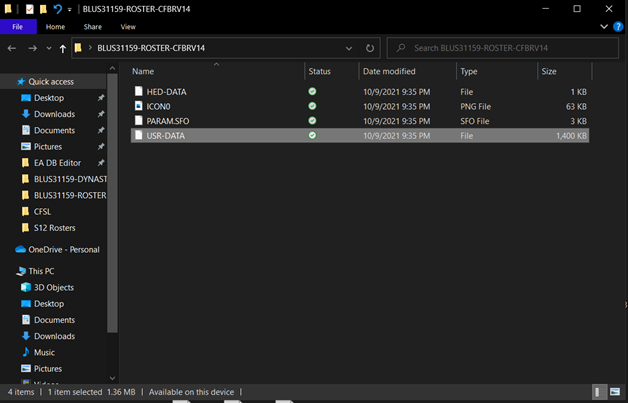
3. Double click on the newly pasted roster folder on your desktop, and it will bring up it’s location in windows file explorer.
4. At this point, you will need to right click on the file, select “rename” and just add .MC02 Final file name should say USR-DATA.MC02 (zero not the letter O) It will ask you if you’re for sure you want to rename, just click yes/okay
5. Now, go to your EA editor application and open it up. Once the editor is open it will be blank, select File > Load config.
6. Select Xan’s NCAA 14 ROSTER config (may have to find the proper file path)
7. The Editor should now look like this

8. Select File and then Open, then locate your USR-DATA.MC02 file that your renamed from step 5 and load this file.

9. At this point, it will take several seconds to load but you should then have your roster available to make edits. During the time you are editing and especially when you are done, SAVE your roster in the EA editor application!! A good rule of thumb is to always have 2 files of the original roster file available because there is no undo button on this application. It is encouraged to save often after every small edit because then if you mess up, you can just close out of the application and reload the latest save of that roster edit without starting over (there is no undo button, please realize this). See the save roster function below.

10. When completely done editing, you have saved, and are ready to exit everything, first quintuple check that you SAVED. Exit the editor, go back to Windows file explorer to your USR-DATA.MC02 file that you renamed in step 4. You now need to rename it back to just USR-DATA just delete the .MC02 part that you added previously in step 4. It should now say USR-DATA only now.
11. Copy the entire Roster folder on your desktop, go to windows file explorer and locate RPCS3 saves once again through the file path described in step 1. RPCS3 < dev_hdd0 < Home < 00000001 < savedata < BLU#####-Roster-Nameofyourroster
12. Paste this new roster folder into the savedata file, it should just replace/update the roster folder in your RPCS3 location.
13. Watch this guy’s video below to learn a little about how the application works to edit rosters. It’s kind of long but it will give you some basics to just play around with and understand. NCAA Football 14: Roster Editing 101 – Youtube.
CROSSPLATFORM INSTRUCTIONS
WHAT DOES CROSSPLATFORM MEAN?
- These instructions are to be utilized if a user has both a PS3 and RPCS3 or if two or more coaches have access to both PS3 and RPCS3.
- RPCS3 rosters are formatted differently than the PS3 rosters. It is an extensive process to convert/rebuild an RPCS3 save file to a true PS3 file. However, PS3 files can easily be converted for use on RPCS3 with ease. Therefore, it is encouraged that coaches utilize a PS3 roster initially as a base roster to begin with. It is not within the scope of this document to explain how to rebuild PS3 files from an initial RPCS3 file. BUT NEVER FEAR, there is an easier fix which will be outlined below.
- If you have a PC and are running RPCS3, you can utilize the import / export function on the editor to create a .CSV file on excel that a PS3 user can then import into their roster.
- The opposite is true, if you have a PS3 roster, there is a simple process in which you can give another coach your PS3 roster and they can utilize it on RPCS3
ACCESSING PS3 ROSTER FOR RPCS3 USER
1. This set of instructions is for a PC user to utilize a true PS3 roster file on RPCS3.
2. In order to begin, you must first go back and follow the instructions required for PS3 file roster editing. You have already downloaded the EA DB Editor, so you must go through the Microsoft Redistributable package download, Bruteforce Save Data download and installation, and then teach yourself the decryption process with Bruteforce as outlined in PS3 Roster Editing 101 instruction above on page 6. You will notice that the editor process is the same, an original PC file is formatted so that you do not have to decrypt with Bruteforce first, however the PS3 file will need to do this.
3. After all programs and applications have been downloaded and installed, and all steps have been taken to move a PS3 file to the PC begin by opening Bruteforce. Locate your PS3 file in Bruteforce that you want to “convert”, undergo the decryption process outlined in PS3 Roster editing 101 steps 1 through 4. Do not add the .MC02 to your file now. All you need to do is leave the file decrypted and exit Bruteforce. Place a copy of this decrypted file in your proper RPCS3 file path RPCS3 < dev_hdd0 < Home < 00000001 < savedata < BLU#####-Roster-Nameofyourroster and then boot up RPCS3 to see if it works.
ACCESSING RPCS3 ROSTER FOR PS3 USER
1. This set of instructions is for a PS3 user to utilize a PC roster on PS3.
2. In order to begin, you must first go back and follow the instructions required for PS3 file roster editing. You have to have all of the components of the PS3 instructions as outlined above.
3. Open your PC file in the EA Db Editor, then utilize the export function in the editor to export all players into a .CSV excel file.
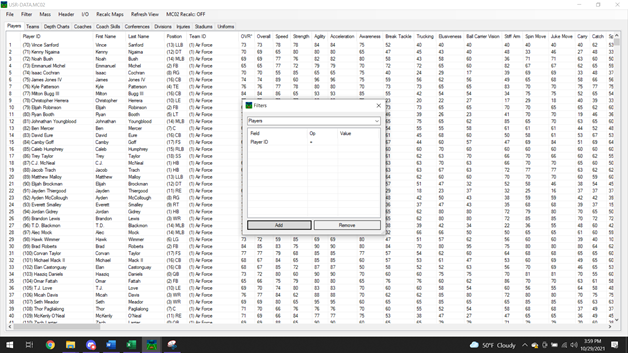
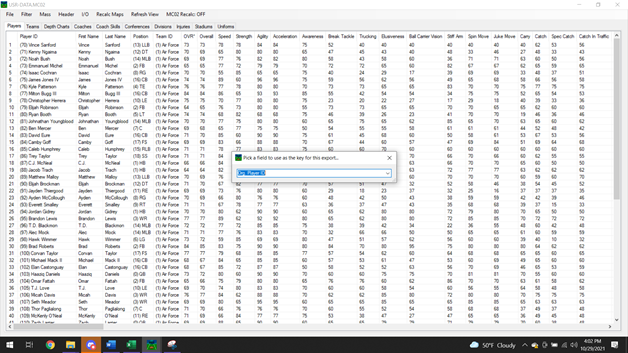
4. I/O is the import / export function, click that, export, all visible. Then select Org. Player ID as the field to use as the key for export.
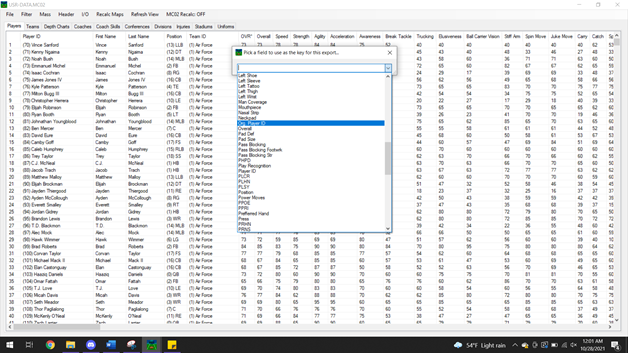
5. Once Org. Player ID is selected, click the exit from the prompt box and it will then ask you to save the .CSV file. Save it to your desktop or preferred location that is easy to get to.
6. Exit from the editor and the PC roster file. Close all applications and programs that may cause confusion.
7. Find your PS3 file, run the decryption process through Bruteforce, then continue to load it up into the editor.
8. Select the I/O option again, except this time click import, overwrite existing, then select the .CSV file you just created from your PC file. It may take several seconds or even minutes to load as it is a significant amount of players. Remember to SAVE your work! ALWAYS save! Now the staff member with the PC roster should have the same as the PS3 user. This function does not change any of the coaches or other changes that might take place during a complete file overhaul, the players are the only thing changing during this process.
CSV FILE IMPORT / EXPORT INSTRUCTIONS
1. This section is to instruct on how to import and export CSV files. CSV files can be viewed in Excel and make transferring data on rosters quick.
2. RPCS3 roster file should be renamed as directed in the instructions above to be USR-DATA.MC02. PS3 files will require decryption through Bruteforce and then rename the file to USR-DATA.MC02.
3. Once the file has been changed, go to the EA DB Editor as shown before. Load Xan’s NCAA 14 roster config. Then, load your roster file.
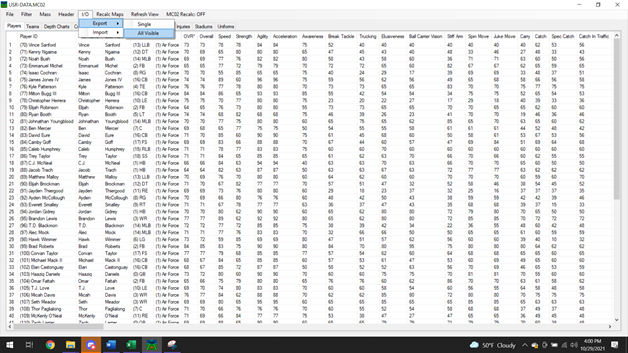
4. Once the roster file has been uploaded, you can either use the filter by team function first or you can export every player on the roster into a CSV file.
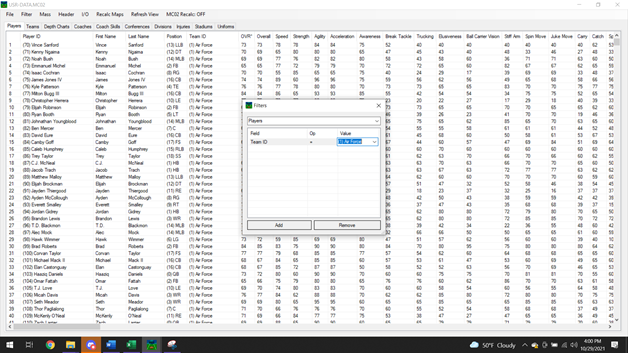
5. After sorting as needed, click the I/O function at the top of the editor, then choose export, all visible, then the ORG. Player ID field to export.
6. Name your CSV file, and save it to your desktop for quick access. DO NOT save it to the roster folder which will be the default location.
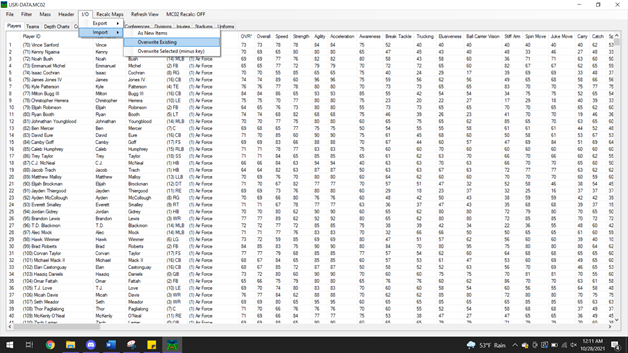
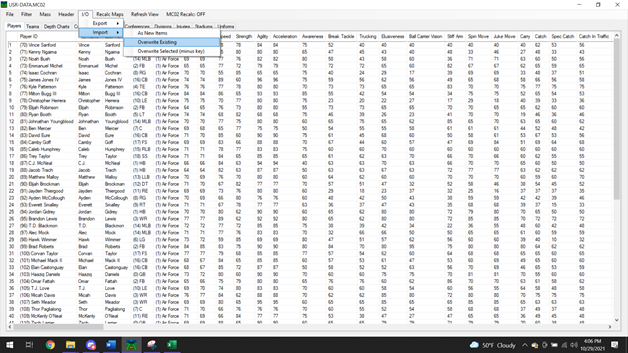
7. For importing a file, if you are only importing a specific team roster, first filter the editor by that team. Then select I/O, import, overwrite existing. Select the proper file to import.
8. View OKST56’s video for further explanation here: https://youtu.be/raLPnbVk7BQ
CSV FILE ABBREVIATIONS

Thank you to OKST56 and HornsNation for compiling the information and putting this tutorial together!